
Cells are far too small to see clearly with the unaided human eye. Even a relatively large animal cell is only a few tens of micrometres across. To investigate structures at this scale, scientists use microscopes to produce enlarged images of cells and their components.
For AICE Marine Science, however, simply knowing what a microscope does is not enough. You need to be able to interpret images of cells, recognize the information provided by different types of micrographs, and calculate magnification accurately.
Magnification Calculation Formula
Magnification is calculated by comparing the physical dimensions of the image against the specimen’s real size. M = I / A
In this formula:
M = Magnification (denoted with an “×” sign, such as × 100)
I = Measured image size (determined via ruler or other measuring tool)
A = Real-world object size (ensure units are consistent with I)
Example
- Image size = 40 mm
- Actual size = 10 mm
Magnification = 40 / 10, therefore Magnification = 4×
Important Tips
- Always use the same units
- Use scale bars when provided
- Measure the scale bar, not the entire image
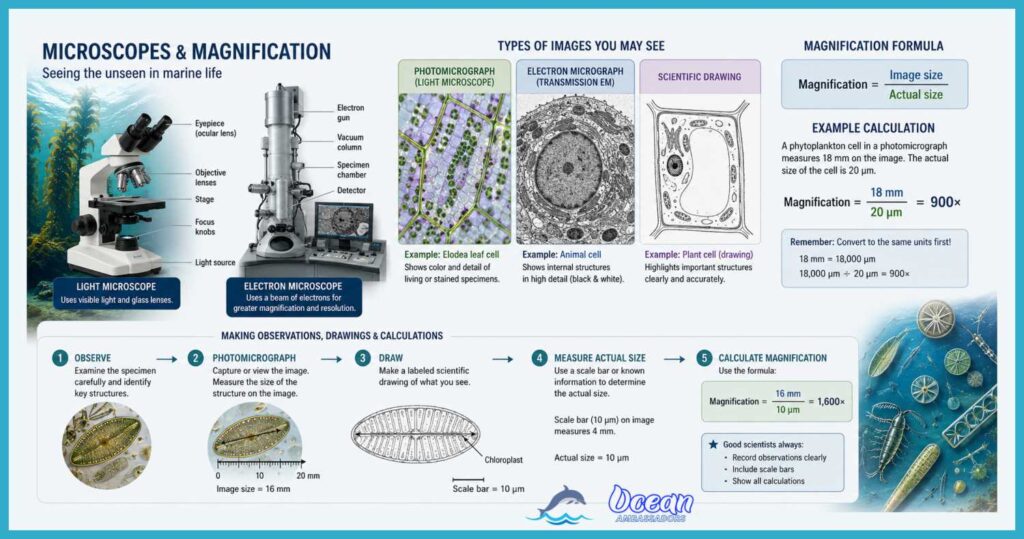
Magnification – What You Need to Know
Under a microscope we never see a cell at its true size — we see an enlarged image of it. Magnification tells us how many times larger that image is than the real object, and it comes from one relationship: magnification = image size ÷ actual size.
Because it compares one length with another, magnification has no units — a magnification of ×200 simply means the image is 200 times bigger than the specimen. The same equation can be rearranged for whatever you need to find: actual size = image size ÷ magnification, and image size = actual size × magnification.
The single most common way to lose marks here has nothing to do with the formula itself — it’s units. You measure the image with a ruler in millimetres, but cells are so small that their real sizes are given in micrometres (µm), and the two must match before you divide.
Since 1 mm = 1000 µm, a structure measured as 40 mm on the page is really 40 000 µm. Forgetting that conversion is what turns a correct method into an answer that’s wrong by a factor of a thousand, so always convert both numbers to the same unit first, then do the arithmetic, then state your answer with its unit.
Often a micrograph won’t print the magnification at all — instead it carries a scale bar, a short line labelled with the real length it represents, such as “50 µm”. To find the magnification yourself, measure the scale bar with a ruler, convert your measurement so it matches the label, and divide: a bar representing 50 µm that measures 10 mm (= 10 000 µm) gives a magnification of 10 000 ÷ 50 = ×200.
From there you can find the true size of any structure either by dividing its measured size by the magnification, or more directly by comparing it to the bar — a cell four times as wide as the scale bar must be 4 × 50 = 200 µm across.
Scale bars are actually more reliable than a printed magnification value, because if the image is enlarged, shrunk, photocopied or zoomed on a screen, the bar is resized by exactly the same amount and stays correct, whereas a stated “×200” would quietly become wrong.
From Cells to Micrographs
A micrograph is an image produced using a microscope. You may encounter several different types of images when studying cells.
Light microscopes use visible light to illuminate a specimen. They can produce images called photomicrographs. Light microscopes allow scientists to observe whole cells and some larger structures within them.
Electron microscopes use a beam of electrons rather than visible light. They have much greater resolving power than light microscopes, allowing scientists to observe much smaller structures.
There are two major types of electron microscope images you may encounter:
- Transmission electron micrographs (TEMs) show structures inside cells. Electrons pass through a very thin section of the specimen, producing a detailed image of internal structures.
- Scanning electron micrographs (SEMs) provide information about the surface of a specimen. They can give the image a three-dimensional appearance.
You may also be given a scientific drawing rather than a photograph. A drawing is an interpretation of what is visible rather than a direct image. When interpreting a drawing or micrograph, concentrate on the structures you can actually identify rather than trying to guess details that are not shown.
What Should You Look For?
When interpreting a cell image, start by asking some basic questions:
Is it a plant cell or an animal cell?
Plant cells typically have structures such as a cell wall, chloroplasts, and a large permanent vacuole. Animal cells do not have these structures.
Next, look for structures shared by both types of cells, such as the cell surface membrane, cytoplasm, nucleus, and mitochondria.
Remember that not every structure will be visible in every micrograph. The appearance of a structure depends on the type of microscope, the preparation of the specimen, the section being viewed, and the magnification.
A good AICE answer describes what the image actually shows. Avoid claiming that a structure is present simply because it would normally occur in that type of cell.
AICE Exam Tip: Read the Image Carefully
When interpreting a micrograph or drawing, don’t immediately start calculating. First identify what information the image provides.
Ask yourself:
- What type of image is this?
- What structures can I identify?
- Is there a scale bar?
- What units are being used?
- Am I being asked for image size, actual size, or magnification?
- Have I converted all measurements into the same units?
For diagrams, remember that scientific drawings should be clear, large enough to see, accurately proportioned, and labelled with straight lines. In an exam, practice drawing a simple labelled structure efficiently. You may have only a few minutes, so avoid spending valuable time on artistic details.
The goal of microscopy is not simply to make cells look bigger. Magnification allows us to see structures that would otherwise be invisible, while careful interpretation allows us to turn those images into scientific information. For AICE Marine Science, learning to read the image, use its scale, and calculate accurately is just as important as knowing the names of the structures themselves.
Virtual Microscope & Magnification Trainer
Measure real marine micro-specimens, then master the calculation examiners love to catch you on.
Drag the two amber handles to measure a feature. Then reveal the method to turn your measurement into a real size.
The one formula
Cover the value you want. Image and actual must be in the same unit before you divide — that is where most marks are lost. 1 mm = 1000 µm · 1 µm = 1000 nm.
Ocean Ambassadors · built for Cambridge International AS & A Level Marine Science 9693